Thursday, 22 February 2018

Convert single column into multiple in Spark

Consider below Sample JSON which has geo column with latitude and longitude values.
let's convert this into multiple columns dynamically.

{"Name":"Hanu","Address":{"Address1":"11213","Address2":"N TEST BLVD","City":"MIAMI"},"State":"FL"}

Below code will convert the Address into multiple columns
val sample = spark.read.json("/myHome/sample.json")
smaple.select('Name,"$Address.*",'State).show
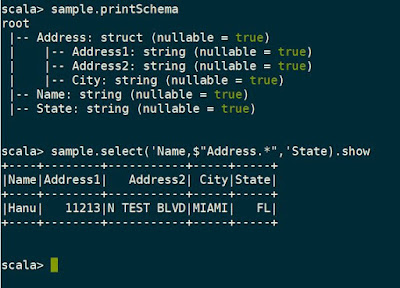
Code snippet


Friday, 2 February 2018

Pyspark Setup with PyCharm Community edition on Windows

 Spark setup:

  1. Install Java and Python
  2. Download spark from here and extract to a directory C:\ spark-2.3.1-bin-hadoop2.7
  3. Clone the GIT repository winutils. Let’s say it is C:\winutils
  4. Set the system environment variables as below
    HADOOP_HOME=C:\winutils\hadoop-2.7.1
    SPARK_HOME=C:\spark-2.3.1-bin-hadoop2.7
    verify the environment variables from command prompt àecho %SPARK_HOME%
    **Restart the cmd window/computer if required for these variables to take effect
  5. Create a temporary directory for hive. Let’s say the path is C:\tmp\hive
  6. Change the permissions to C:\tmp\hive directory to Full control to everyone (restrict to a specific user if required)
  7. Now run pyspark command in cmd window from SPARK_HOME directory.

Pycharm configuration:

  1. Install pyspark interpreter (File→ Settings→ Project Interpreter →  click on + and search for pyspark Install package


  2. Create a new project called spark-test and create a file called test.py in the project


  3. Write a simple script to read and display records with ‘Spark’ in SPARK_HOME\README.md


  4. Add pyspark libraries to the project

    File→ Settings→ Search for Project Structure→ click on Add Content Root→ select SPARK_HOME\python\lib


  5. Run configuration: 

    Run→ Edit Configuration→ click on + button to add new config → Select Python and configure as below


  6. Execute the program. You should see the results below


Sunday, 21 January 2018

Reading XML files using Hive

Scenario 1:
Consider an XML file as below

<row Id="1" Reputation="100" creationDate="2008-07-31T14:22:31.317" DisplayName="Test 1" LastAccessDate="2016-12-10T22:12:46.367" WebsiteUrl="http://www.joelonsoftware.com/" Location="New York, NY" />
<row Id="2" Reputation="250" creationDate="2008-07-31T14:22:31.317" DisplayName="Test User2" LastAccessDate="2016-12-10T22:12:46.367" WebsiteUrl="http://www.test.com/" Location="Phoenix, AZ"  Age="25"/>

Download Jar:

From Hive CLI/Beeline:

add jar <above_jar_location>;

CREATE EXTERNAL TABLE test_xml(
Id int,
Reputation int,
creationDate timestamp,
displayName string,
location string,
age int
)
ROW FORMAT SERDE 'com.ibm.spss.hive.serde2.xml.XmlSerDe'
WITH SERDEPROPERTIES (
"column.xpath.id"="/row/@Id",
"column.xpath.Reputation"="/row/@Reputation",
"column.xpath.creationDate"="/row/@CreationDate",
"column.xpath.displayName"="/row/@DisplayName",
"column.xpath.location"="/row/@Location",
"column.xpath.age"="/row/@Age"
)
STORED AS
INPUTFORMAT 'com.ibm.spss.hive.serde2.xml.XmlInputFormat'
OUTPUTFORMAT 'org.apache.hadoop.hive.ql.io.IgnoreKeyTextOutputFormat'
LOCATION '/path/to/xml/file'
TBLPROPERTIES (
"xmlinput.start"="<row ",
"xmlinput.end"="/>"
);


Scenario 2:

Consider Below XML:

<CATALOG>
<BOOK>
<TITLE>Hadoop Defnitive Guide</TITLE>
<AUTHOR>Tom White</AUTHOR>
<CURRENCY>USD</CURRENCY>
<PRICE>34</PRICE>
<YEAR>2017</YEAR>
</BOOK>
<BOOK>
<TITLE>Programming with Spark</TITLE>
<AUTHOR>I don't know</AUTHOR>
<CURRENCY>USA</CURRENCY>
<PRICE>29</PRICE>
<YEAR>2018</YEAR>
</BOOK>
</CATALOG>

Create table as below:

CREATE EXTERNAL TABLE books (title string, price float,currency string)
ROW FORMAT SERDE 'com.ibm.spss.hive.serde2.xml.XmlSerDe'
WITH SERDEPROPERTIES (
"column.xpath.title"="/BOOK/TITLE/text()",
"column.xpath.currency"="/BOOK/CURRENCY/text()",
"column.xpath.price"="/BOOK/PRICE/text()")
STORED AS INPUTFORMAT 'com.ibm.spss.hive.serde2.xml.XmlInputFormat'
OUTPUTFORMAT 'org.apache.hadoop.hive.ql.io.IgnoreKeyTextOutputFormat'
LOCATION '/path/to/xml'
TBLPROPERTIES ("xmlinput.start"="<BOOK","xmlinput.end"= "</BOOK>");

**** Do not specify the Root node i.e <CATALOG> in TBLPROPERTIES****


Thursday, 19 October 2017

Number of executors and memory calculation in spark

Consider below cluster configuration:

No.of nodes - 6
No.of cores on each node - 16
Memory on each node - 64GB

Number of executors can be considered dynamically based on the usage with the property spark.dynamicAllocation.enabled=true;

If need fixed no.of resources,Good way to design is:

1. Each node should have 1 core and 1GB memory for AM.
==>each node will have 15 cores. It is good to have max of 5 cores for each executor.
==>total no. of executors per node = 15/5 = 3
                      ==>--num-executors 3*6 =18 --executor-cores=5
2. Total memory available in each node - 63GB (As we excluded 1GB for Application Master)
==> Total Memory per each executor = 63/3=21GB
==>0.07*Total memory for Yarn overhead for each executor i.e 0.07*21 ~=2GB
                       ==>Final memory per executor=21-2=19GB i.e --executor-memory=19G

Wednesday, 18 October 2017

Loading data from multiple sources which are not in sync to Final table

--day 1 data--
pk a pk b pk c
1  x 1 y -  -
--stage table1
pk a b c
1 x null null
1 null y null
----- union and group by on pk, get max on each col
--INSERT OVERWRITE TABLE stage_tbl SELECT pk,max(a),max(b),max(c) FROM stage_tbl1 group by pk;
--stage_tbl
pk a b c
1 x y null

--First time load to Final table
--final_tbl
pk a b c timestamp
1 x y null 2017-10-18 11:00:04

--day 2 data--
pk a pk b pk c
- - - - 1  z
2 a 2 b 2 c
3 p 1 o 3 r

--stage table1
pk a b c
1 null o null
1 null null z
2 a null null
2 null b null
2 null null c
3 p null null
3 null null r
----- union and group by on pk, get max on each col
--INSERT OVERWRITE TABLE stage_tbl SELECT pk,max(a),max(b),max(c) FROM stage_tbl1 group by pk;
--stage_tbl
pk a b c
1 null o z
2 a b c
3 p null r

---delta load to final table

Set1 : select * from final_tbl f where pk in (select pk from stage_tbl)
Set2 : select pk, COALESCE(s.a,f.a) as a,  COALESCE(s.b,f.b) as b,  COALESCE(s.c,f.c) as c from stage_tbl s left join  Set1 f on s.pk=f.pk;
Set3 : select * from final_tbl f where pk not in (select pk from stage_tbl)

insert overwrite table final_tbl (select pk,a,b,c,current_time() from Set2 UNION select pk,a,b,c,current_time() from Set3);

Note: Consider utilizing partitions and buckets on attributes/cols like category for improved performance

Thursday, 23 February 2017

Calculating Cumulative totals/Running totals in Hive

Hi All,

Many of us might have come across a requirement to implement running totals. Below are a few of the implementations.

Consider a bank maintains account and balance details as below.


Running total should give the sum of balance from beginning to current month.

SELECT acc_no, acc_type,Yr_Mnth, bal, SUM(bal) OVER (PARTITION BY (acc_no,acc_type) ORDER BY Yr_Mnth)  as running_total FROM bnk_bal;


If rolling has to happen to a fixed number of rows, we can use RANGE BETWEEN.
ex: Below query will give the running total for every 3 months.

SELECT acc_no, acc_type,Yr_Mnth, bal, SUM(bal) OVER (PARTITION BY (acc_no,acc_type) ORDER BY Yr_Mnth RANGE BETWEEN PRECEDING 2 ROWS AND CURRENT ROW)  as running_total FROM bnk_bal;

Thursday, 26 January 2017

Flume Tutorial

Download and import Hortonworks sandbox into VM.

Start the VM once imported and open the URL shown on screen once the sandbox is ready.
Hortonworks Sandbox URL


Enter the above URL in browser and open Ambari to make sure Flume service is running


Flume Service check


Connect to sandbox from any ssh client like putty. (I've used Mobaxterm here)

HWX sandbox connection from ssh client


Create Config file as below in any directory of your choice

Flume Configuration


Change the directory to /usr/hdp/current/flume-server/bin

Execute the below command to start Flume agent i.e agt1 in above conf file. and connect to related channel & sink.
flume-ng agent --conf conf --conf-file /root/flume_conf.conf --name agt1 -Dflume.root.logger=INFO,console

Flume stats


Make sure that Sink, Source are started and connected with an active channel. (observe the above diagram)

Now, go to the source/spool directory location given in conf directory and create a sample file.
you will observe the file getting consumed immediately after the creation.

TestFile creation in spool directory

Started moving the file

Process completed


Source file renamed


File created in HDFS (sink directory)


Observation:  the file in source directory will be renamed to <filename>.COMPLETED

The Mindset Behind Reliable Data Systems I’ve been in data engineering long enough to see the stack change many times over. Tools come and g...